2013年12月18日 星期三

【手作】寶石襪 | Gem Socks


線材: 愛編織的羊代購-三拒三利212線,50G,色號忘了~~

工具: K牌碳纖維輪針3mm-120CM線1付、縫線針、記號圈

工時 : 工作天數約13天(每日約1~2H編織)

織圖出處: Rita`s 毛線襪


2013年12月3日 星期二

【手作】織工社12月團織-麋鹿帽 | reindeer antler baby beanie


線材: 帛媽毛線舖100%BABY Alpaca 拉2股+徐家 27支100%cashmere拉兩股,不到20G、
奶棉白色約10G以內。

工具:彩木輪針3.75mm+金屬方針4mm+碳纖維針3mm、記號圈、縫線針、棉花

工時 : 工作天數約3天(每日約2~3H編織)

織圖出處:FB社團- 織工社12月分團織, R網出處


2013年12月1日 星期日

【手作】 貓窩 | Cat cave


線材: 一堆有沒的沒剩線合股,約300G

工具:彩木粗輪針10mm-長120CM線1付、10mm粗鉤針、縫線針

工時 : 工作天數約2天(每日約3~4H編織)

織圖出處: 無圖,從腦子憑空生出來的


【手作】TKA-2013-12 帽子 | Truffle


線材: 愛編織的羊代購-三拒三利212線拉兩股,40G,色號忘了~~

工具: K牌竹製輪針4.5mm-120CM線1付、縫線針、別線

工時 : 工作天數約2天(每日約3~4H編織)

織圖出處:TKA-2013-12群織活動

2013年11月15日 星期五

【手作】TKA 2013-11 - 棒棒糖無指手套 | BonBons


線材: 愛編織的羊代購-三拒三利212線,40G,色號忘了~~

工具: K牌竹製輪針3.75mm-120CM線1付、縫線針、別線

工時 : 工作天數約4天(每日約2~3H編織)

織圖出處:TKA-2013-11群織活動, R網織圖


2013年11月9日 星期六

【手作】Capucine | 飛行帽(配色版本)


線材:滿嬌姐姐- 貝蕾妮絲絨黑色50G、灰50G,20G深藍色剩線

工具: K牌彩木輪針5mm、縫線針、毛線做球器

工時 : 工作天數約3天(每日約2~3H編織)

織圖出處: R網免費織圖

【手作】Capucine | 飛行帽


線材:滿嬌姐姐- 貝蕾妮絲絨白色70G、黃色50G

工具: K牌彩木輪針5mm、縫線針、毛線做球器

工時 : 工作天數約3天(每日約2~3H編織)

織圖出處: R網免費織圖

2013年10月29日 星期二

【手作】 Leaf Evolution Mystery KAL | 葉進化之謎KAL


線材: Melody Superwash #40-100G、絲光小夜曲YJ16約5G、透明白彩3mm日本珠

工具: K牌彩木輪針3.5mm、3.75mm、4mm、日規7號方針、4.5mm、6.5mm收邊

工時 : 實際工作天數約17天(每日約2~3H編織)

織圖出處: R網KAL團織(付費)

織物完成大小: 176公分*71公分(定型後)


2013年10月13日 星期日

【手作】TKA2013-09 | Empire State | 帝國配色頸圍


線材: 帛媽毛線舖代購- 鄂爾多斯-秋香綠70G、玫瑰絨線-HD301-100G

工具: K牌彩木輪針4.5mm、縫線針、記號圈、別線*1

工時 : 約3天(每日約4H編織)

織圖出處:台灣TKA群織團-9月、 R網出處 

織物完成大小: 寬19cm*縫合後長28.5cm


原先計畫的色彩是秋香綠配上灰色,低調又不失活潑的配色感,
在10月初的北海到秋季旅行回台後,便把織了好幾段的配色給拆光,重新搭配。

2013年10月5日 星期六

【手作】Sweet Reflections 插肩袖小外套


線材: 葡萄牙 Rosários 4 Merinus #17,300g,滿嬌姐姐贈棉質混紡線,約150g

工具: K牌彩木輪針5mm、日規7號玫瑰木方針、彩木3.75mm輪針

工時 : 實際工作天數約12天(每日約4H編織)

織圖出處: R網 、小胖老師9月教學

織物完成大小: L~XL號(未下水)

2013年9月23日 星期一

【手作】Camino Bubbles | 大泡泡


線材: Melody Superwash #87-100G

工具: K牌竹輪針3.75mm

工時 : 實際工作天數約10天(每日約2~3H編織)

織圖出處: R網付費織圖

織物完成大小: 178公分*51公分(定型後)


2013年9月19日 星期四

【引用】真絲的保養


真絲產品的洗滌與保養     
 人們通常所說的真絲指的是桑蠶絲,是桑蠶吐出來的蛋白纖維,它含有多種對人體有益的氨基酸:隨著人們對環境保護意識的逐漸加強以及對生活品質的要求不斷提高。
身為天然纖維的真絲制品因此受到更多的青睞。
 不少人認為真絲太嬌貴,容易皺,褪色。

使用壽命短等等。其實,這些都是由于洗滌和保養不當造成的。只要掌握了正確的洗滌與保養方法,就完全可以使真絲織物保持光鮮的色澤和特有的柔順質感,長久地體驗真絲給您帶來的高貴感受。

一、干 洗 篇
條件允許時請盡量采用干洗,真絲的品質不容易受干洗溶劑的影響,因此干洗是保養絲織物的最安全的方法。
當你將絲質衣物送洗時,請留意以下幾件事情
1、選擇正規、專業的干洗店。
2、沾到污漬的衣服,請盡快送洗。
3、可能的話,告訴干洗者污漬造成的原因。
4、請將污點處告知干洗者,尤其是那些濺到淺色、物色酒類或汽水的污漬。
5、如果有些部分因摩擦而造成褪色現象,請告訴干洗者,這樣就可以用特殊處理再恢復原樣。

二、水 洗 篇
在沒有干洗條件的情況下,可以采用水洗的方式。真絲產品的水洗需要專業的知識,因此請嚴格按照產品上的水洗標識的要求洗滌。

2013年9月10日 星期二

【手作】Maddie's Tiny Dress(加長版) |給小妞的小禮服


線材: 日本買的BIG BALL Melange,白色3顆、奶茶色1顆,
帛媽毛線舖購得阿爾巴卡-暗桃紅色2顆,總重約400G。

工具: K牌彩木輪針5mm1付/120公分 

工時 : 實際工作天數約14天(每日約2~3H編織)

織圖出處: R網付費織圖

織物完成大小: 胸圍約40公分,衣長61公分(未下水)

2013年9月4日 星期三

秋天來了!


經過了兩周連續來的颱風,秋天的腳步,就在不知不覺中,已經來到,

出門開始會覺得有些涼意,於是趕緊幫又長大很多的小妞添織保暖的衣服


隨著秋天來臨,YAHOO的部落格也宣告結束,
讓人錯呃,也有些措手不及;

最後,我決定在GOOGEL這裡落腳,
繼續編織著愛與溫暖!

2013年8月25日 星期日

【手作】 Vera Bear--維拉熊皮


線材: 帛媽毛線鋪--長毛海約140G,拉兩股

工具:  宏達4.5mm輪針80公分1付、35公分2付、43公分1付、
彩木迷你輪針4.5mm、金魚牌迷你輪針日規8號、縫線針
配件: 玩偶眼睛1對、棉花(未填上)
工時 : 約8天(每日約2~3h編織)
織圖出處:  R網付費織圖

織物完成大小: 約40cm*28cm


夏天,漸漸進入尾聲,
秋天就要來臨了,織物不趕緊完成,

2013年8月19日 星期一

【手作】第一雙毛線襪


線材: 帛媽的毛線鋪-外貿襪線,約80G

工具: 碳纖維輪針3mm/100公分, K牌迷你輪針 3mm、2.75mm 

工時 : 實際工作天數約7天(每日約4H編織)

織圖出處: 玉穎的織襪經驗分享

織物完成大小: 約24cm/38號(未下水)

2013年8月13日 星期二

【手作】Andrea Vest (simple) | 安德烈小背心


線材: 小吉舖Alize Bebe草莓牛奶約120G,寶寶絲蛋白絨約120G,兩線合股
工具: K牌彩木輪針5mm、釦子5顆
工時: 約5天(每天3~4h編織)
尺寸: 7歲小童大小  (((我家小妞太大隻了)))


2013年8月11日 星期日

【出售】美線割愛---全數售完


即將出國之際,許多線材帶不走,
忍痛割愛,有興趣的姐妹歡迎議價
議價保留3天,後續沒回應確認的姐妹、付款的姐妹,只能說抱歉囉!!

九色鹿棉麻灰色*8顆1包/市價約400~500$---售出


2013年7月23日 星期二

【手作】睡睡羊 II --讓我再睡一下下


線材: 帛媽毛線舖--奶棉白色、水彩色、深咖啡色線約15公分
工具: 4號鉤針(白色)、5號鉤針(水彩色)、縫線針、填充棉花
工時: 約4天,(每日1~2小時)
出處:FB社團" 黛娜手作樂園" -勇氣工廠義賣團織活動
織物大小: 約18公分


2013年7月22日 星期一

【手作】魚鱗嬰兒鞋


線材: 小吉舖寶寶羊絨-淡湖藍約20g
工具: 4號鉤針、縫線針
工時: 2天(每日約3~4h)
織圖出處:  看圖說故事, 又是自己胡亂看照片鉤的
織物大小: 鞋底約長10公分,高9公分,寬4.5公分


2013年7月21日 星期日

【手作】睡睡羊 I~~一起去旅行


線材: 小吉舖寶寶羊絨-白色+淡湖藍不到25G、深咖啡色線約15公分
工具: 4號鉤針(白色)、5號鉤針(淡湖藍)、縫線針、填充棉花
工時: 斷斷續續約6天,(每日1~2小時)
出處:FB社團" 黛娜手作樂園" -義賣團織活動
織物大小: 約16公分


2013年7月2日 星期二

【手作】 Vera --毛線泰迪熊


維拉是一隻經典的泰迪熊,由繁複的毛線編織而成,
友善,而多愁善感;
不論是老人或是小孩,或是成年人,都很喜愛!


2013年6月25日 星期二

【手作】Forbidden Flowers


線材: 愛編織的羊-絲光小夜曲YJ13,約80G
工具:  宏達不鏽鋼 3.5mm、4mm、4.5mm  輪針
工時 : 約12天(每日約2~3h編織)
織圖出處: 紫璇新竹研習、R網出處
織物完成大小: 約158cm*53cm


2013年6月12日 星期三

【手作】喀地干外套


Cardigan(喀地干)
 cardigan是個學術名詞,也是個外國地名,
在紡織科技的學術名,其實就是 開襟毛衣的意思!


線材: 帛媽--阿爾巴卡灰色50G*3球+不到20G洋紅、奈奈小蜜蜂的交換禮物-粉嫩色
工具:  K牌彩木7mm輪針  粗勾針、縫線針
工時 : 約4天(每日約2~3h編織)
織圖出處: 小胖的五月社團活動
織物完成大小: 約48cm*40cm


2013年6月5日 星期三

【出售】Persil Silk & Wool洗滌劑少量釋出---售完


5月底回台灣時知道行李一定會超重,洗滌劑就帶的不多,

原本打算大採購裝箱運回台灣,看了看新加坡寄台灣的運費,臉都綠了,

單瓶淨重約800G,來個10公斤運費就要折台幣近2000$,

如果這運費轉加到這洗滌劑上,就貴好多,也怕運送途中被撞壞或是什麼的,

再加上入海關再抽一次稅,便宜的好物,價格就會翻3倍,

好意的分享,就會變成一種負擔,所以這次只帶少少的回台,

沒有下次了,因為不會再回新加坡,要去米國當米蟲(((誤~~

又要飛出去長時間,所以不再做這種吃力不討好的事,

還讓行李超重差點被罰錢,被罰了就4張小朋友飛掉勒~~~~


Persil Silk & Wool洗滌劑


釋出少量--------剩餘-0瓶(每人限帶1瓶)


上次帶過的姐妹,我只說抱歉,高投貴手這次不要再搶購啦!!

讓其他姊妹也使用看看吧!!


羊毛、蠶絲專用的洗滌劑

使用心得非常不客觀,目前沒有人分享出這專用洗滌劑洗出來有無差別,

個人的感覺是比柔軟精泡出來的手感更加滑潤,乾燥後毛也比較蓬鬆,純毛的扎刺感有減少,

這不是推銷文,純粹是想分享給皮膚較敏感的姐妹,

愛用羊毛編織,卻穿不上身是很可惜的!!


從開始真正認識毛線的種類後,一直對羊毛專用的清洗劑抱著一種好奇的心態,

明明是又刺又扎的純羊毛,為什麼老外能穿的那麼舒適?

打從老爺常跑歐洲後,每次出差都特別請他在當地找找有沒有羊毛專用的洗滌劑,

每次都沒找到,在英國的網站上有看到1000ML和350ML的,

但價格頗高,含運費運回台灣應該4張小朋友跑不掉,看的心都碎了!


偶然在新加坡超市裡的大發現,欣喜望外!!


2013年5月18日 星期六

【手作】Grand Teton Shawl (大提頓公園披肩)


線材: 帛媽毛線鋪--50%真絲50%羊絨,湖藍夾花拉8股,約100G
工具:  K牌日規7號金屬特短輪針、縫線針
工時 : 約10天(每日約2~3h編織,含定型)
織圖出處: R網付費Grand Teton Shawl
織物完成大小: 約162cm*48cm


2013年5月17日 星期五

【手作】手鉤室內地板鞋


線材: 帛媽毛線鋪--鹿王新一代奶棉-水彩段染

工具: 5號勾針

工時 : 約3天(每日約2~3H編織)

織圖出處: 亂鉤的,沒出處

織物完成大小: 16.5cm*7cm(目測大小,實際未測量)


2013年5月7日 星期二

【手作】貝殼鞋? 南瓜鞋?


線材: 九色鹿-新生活約60g(不含毛球50g就夠做1雙)

工具: 宏達不鏽鋼輪針3.5mm

工時 : 約2天(每日約4H編織)

織圖出處: 編織人生

織物完成大小: ??cm*??cm(送人了,未測量)
目測約9*5cm


2013年4月28日 星期日

【手作】Dream bird


Google了一下夢鳥的解釋,在yahoo知識家看到這樣的解釋,轉貼過來。

鵟-夢鳥 是孟鳥的轉音

郭璞云:「爾雅(釋鳥)云:『狂,夢(今本作孟)鳥。』即此也。」珂案:郭注爾雅釋鳥,亦引此經文。狂,玉篇作鵟,疑即鳳凰之屬,已見海外西經「滅蒙鳥」節注。

「滅蒙鳥」及海內西經所記「孟鳥」是也。「為鳥青,赤尾」或「其鳥文赤、黃、青」云云,乃所謂「五采之鳥」,山海經多記有之,皆鳳凰之象。大荒西經云:「有五采之鳥,有冠,名曰狂鳥。」爾雅釋鳥云:「狂,鳥。」實則狂鳥、鳥皆鳳凰屬也,狂即皇,即鳳,音之轉也。鳥又即孟鳥,字之異也。大荒西經又云:「有弇州之山,五采之鳥仰天,名曰鳴鳥。」郝懿行云:「鳴鳥,蓋鳳屬也。」鳴鳥亦鳥、孟鳥也。則此處所記之「滅蒙鳥」,固鳳屬之狂鳥、鳥、鳴鳥、孟鳥之異名也。

2013年4月12日 星期五

美麗的錯誤


美麗的錯誤,該還是不該繼續織完?
整體形狀已經偏掉了,想改也來不及了

2013年4月9日 星期二

【手作】ode to veera 薇拉


線材: 愛編織的羊代購,絲光小夜曲#16(莫妮卡披肩剩線)約35G、#12(德國B披肩剩線約25G)
工具: 帛媽代購,宏達不鏽鋼輪針3.5mm

工時 : 約4天(每日約4H編織)
織物完成大小: ??cm*??cm(下水晾曬中,未測量)
目測約120CM*25CM


2013年4月4日 星期四

I'm a lucky woman


有愛的情誼,沒有國界,沒有距離,更沒有年齡的差距,

Happiness!


Well, I'm a lucky  woman!

2013年3月26日 星期二

【手作】Ginkgo Crescent(小B媽咪聊手作團織)


線材: 帛媽家的100%秘魯幼羊駝,薑黃色合2股,不到50G
工具: K牌金屬輪針日規5(起針)、6、7、8、9、15號(收針),縫線針
工時: 7天,每日編織約2~4H
織物大小: 拉開後約16?cm*4?cm(未下水定型)
織圖出處:  R網原出處, FB社團-小B媽咪聊手作(中文)團織活動

2013年3月20日 星期三

【手作】Knit Red--Sylvi 大紅衣


下水前後,上圖未下水,下圖已下水完成,
袖子相差了15公分左右,衣長也是差10公分左右!


線材: 滿嬌的姐姐團購時尚W276原生態有機羊毛 ,213大紅色,每綑100G,共15顆
工具: K牌6mm彩木輪針、K牌特短金屬輪針、縫線針、7/8號鈎針
配件: 釦子3~5只
總工時 : 約29天(每日約4H編織)
織圖出處: R網付費織圖
織物完成大小: L 號,尚未測量下水後的尺寸
目測連帽長度約有110~120cm左右,寬度應該差不多有90~100cm


2013年3月17日 星期日

【引用】Miffy and her balloon plush toy pattern


My latest creation, my favorite bunny in the world...Miffy. She is dedicated to my pet rabbit Nosy.

As this is a free pattern, pattern is for personal use only and may not be sold, photocopied or copied electronically or distributed in any way. Please don't sell the toy you've made, and please provide credit for the design of the pattern to myself (Knitterbees).

Note: balloon to be put up soon, trying to find a black stick at the moment...


Materials:
1. 8 ply weight wool or acrylic.
2. 3.25mm 40cm circular needles/ 3.25 DPN or size needed to obtain gauge.
3. 3.75mm straight needles or size needed to obtain gauge.
4. Buttons for eyes
5. Stitch marker
6. Stitch holder
7. Yarn needle
8. polyester stuffing

Gauge: 2 inch = 13 stitches, 19 rows

Colours for Miffy:
MC - White
CC1 - Orange
CC2 - Yellow

Knitterbees stitch dictionary:
CC: contrasting color (CC1= contrasting color 1 etc.)
dpns: double pointed needles

【引用】Whit's Knits: Baby Jumper

When there's a baby in the picture, knitters have a hard time sitting idle. Our fingers twitch until we've outfitted that little bundle in our finest efforts. So when Molly's baby Guadalupe joined the Purl Bee family, that was my cue to get knitting!
I designed this Baby Jumper to appease little Lupe's budding sense of style but also her mother's legendary concern for practicality! Loose and soft and comfy, this simple dress is easy to slip over a squirmy baby's head and really works for the longhaul, first as a jumper, then as a tunic, and even later as a shirt. Plus, it's machine washable. Even Molly has to approve!
And since every hand knit baby gift has heirloom potential, I knit this one up in Anzula's very special Sebastian yarn. Sebastian combines superwash merino with sea cell, a newfangled seaweed-cellulose fiber that offers durability, drape and a very pretty soft shine!
PS Want to catch a glimpse of sweet Lupe in her Baby Jumper? Click here to see her on Instagram!

The Materials

  • Anzula's Sebastian, 70% Superwash Merino and 30% Sea Cell.
    • Main Color: 1 (2, 2) skeins. I used the color Seaside (above, right).
    • Contrast Color: 1 (1, 1) skein. I used the color Hyacinth (above, left).

The Pattern

Gauge

7 3/4 stitches = 1 inch in stockinette stitch with larger needle

Finished Sizes

Small, Medium, Large: 6-9 (9-12, 12-18) months
Circumference around bottom hem: 28 1/2 (29 3/4, 31) inches
Circumference around top band: 18 (18 3/4, 19 1/2) inches
Length from underarm (top of band) to bottom hem: 12 (13 1/4, 14 1/2) inches
Length from shoulder to bottom hem: 15 1/4 inches (16 3/4, 18 1/4) (adjustable)
Neck opening: 4 1/2 (4 3/4, 5) inches
NOTE: The photos that accompany this pattern are of the Small size.

Begin

With the US #2 circular needle and the Main Color (MC), cast on 221 (231, 241) stitches.
Place marker and join for working in the round, being careful to not twist the stitches.
Round 1: Purl.
Round 2: Knit.
Rounds 3 and 4: Repeat Rounds 1 and 2.
Round 5: Purl.
Change to US #3 circular needle and knit every round until piece measures 11 (12, 13) inches from cast on edge.
Cut yarn.

The Band

Change to US #2 circular needle and the Contrast Color (CC), leaving a 12-inch tail.
Round 1: *K1, (ssk, k2tog), repeat from * to last stitch, k1. 133 (139, 145) stitches
Now work back and forth in rows, turning the work at the end of each row.
Row 1 (wrong side): With the purl side facing you, knit.
Row 2 (right side): Knit.
Row 3: Purl.
Repeat Rows 2 and 3 four (five, six) more times.**
Repeat Row 2.
Repeat from Row 1 to ** one time.
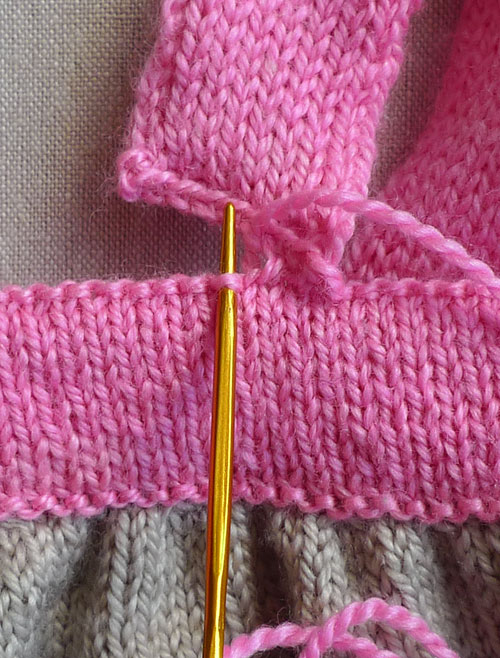
Finishing the Band

Fold the band over so the wrong sides are facing each other and...
1. With the right needle, pick up the purl bump from the color change round that is directly in line with the first stitch on the left needle.
2. Slip the purl bump onto the left needle.
3. Knit two together (the purl bump and the first "regular" stitch).
(At the beginning of the row, repeat these three steps one more time so that you are able to do the next step.)
4. Slip the second stitch on the right needle over the first (just like binding off).
Repeat these 4 steps all the way to the end of the band. (Tip: Check frequently that the stitch you're picking up is still in line with the first stitch on the left needle, otherwise the band will start to skew.)
Cut the yarn, leaving a 12-inch tail.
With a size B crochet hook, use the CC tails to crochet closed the ends of the bands. Here's how:
Insert the hook through the edge of both layers of fabric.
Pull a stitch through and chain 1. On the right-hand side, make 8 (9, 10) slip stitches along the edge of the band, inserting the hook through both layers of fabric each time. Cut the yarn and pull it through the remaining stitch.
On the left-hand side, create a small buttonhole. Here's how: make 6 (7, 8) slip stitches to 1/4 inch from the top of the band, chain 6, reinsert the hook right next to the chains and make 2 slip stitches to the end. Cut the yarn and pull it through the remaining stitch.
Weave in the ends, using the MC tail to close the gap at the base of the band.

Right Strap

With the right side facing you and using a US #2 double pointed needle and the CC, begin 3 1/4 (3 1/2, 3 3/4) inches to the right of the back split...
... to pick up 8 (9, 10) stitches along the top of the band.
Row 1: [kfb] 8 (9, 10) times. 16 (18, 20) stitches
Row 2: Slip 1 knitwise through the back loop, *bring the yarn forward, slip 1 purlwise, bring the yarn back, knit 1, repeat from * to last stitch, purl 1. (For a photo tutorial of this row, visit our Double Knit Belt Project Journal here.)
Repeat Row 2 until strap measures 6 1/2 (7, 7 1/2) inches. (If the recipient of your jumper is on hand, take a measurement from an inch below her armpit, over the top of her shoulder and to the other side of her armpit. Knit the strap to this length minus an inch [because the strap will stretch with the weight of the finished jumper].)
Bind Off Row: [K2tog] 2 times, *pass the first stitch over the second stitch (like a normal bind off), k2tog, repeat from * until one stitch remains. Cut the yarn, leaving an 8-inch tail, and pull it through the remaining stitch.
Fold the dress in half at the back slit and mark the front center of the band.
Situate the bind off end of the strap (making sure it's not twisted!) so that its right edge is 2 1/4 (2 3/8, 2 1/2) inches left of the center front mark.
Using the bind off tail, sew the end of the strap to the top of the band. For a neat finish, sew under the band's top purl bump...
...then under the bottom half of the bind off stitch.

Left Strap

With the right side facing you and using a US #2 double pointed needle and the CC, begin 2 1/4 (2 3/8, 2 1/2) inches to the left of the back split...
... to pick up 8 (9, 10) stitches along the top of the band.
Work from Row 1 through the Bind Off Row of the Right Strap instructions, above.
Then situate the bind off end of the strap (making sure, again, that it's not twisted) so that its left edge is 2 1/4 (2 3/8, 2 1/2) inches left of the center front mark. Sew the strap's end to the top of the band.
Sew a button onto the band across from the buttonhole.
Weave in any remaining ends, gently block and you're done!